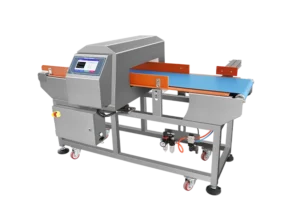
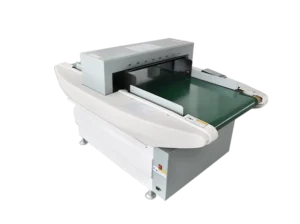
Modern food processing requires strict contamination control, and a properly operated Food Metal Detector is essential to ensure product safety.
Correct operation minimises false alarms, improves sensitivity consistency, and ensures compliance with HACCP, BRC, and retail audit requirements.
This hands-on guide—created for production supervisors, QA managers, and equipment operators—explains how to operate the machine step by step, with practical instructions based on real factory workflows from Jindunelec Solutions.
Understanding the Food Metal Detector Workflow
This section explains what happens in the system, not the operator’s manual steps.
Machine Preparation
The detector initialises its electronic modules, stabilises the magnetic field, and performs internal diagnostics to ensure the system is ready.
Product Learning & Calibration
The detector records the product’s characteristics, compensating for moisture, salinity, temperature, and product effect to prevent unnecessary false rejections.
Continuous Conveying & Scanning
Products move through the aperture while the detection field identifies metallic contaminants (Fe, Non-Fe, SUS).
Automatic Rejection or Alarm
When metal is detected, the machine triggers a reject system (pusher, air-blast, flap, drop chute) or stops the line.
Data Logging & Compliance
Events, test results, alarms, and calibration logs are stored automatically for audits—specifically critical for factories using Jindunelec inspection equipment.
Practical Operation Guide (Hands-On Instructions)
With the workflow understood, the next step is applying it correctly during daily operation.
Step 1 — Pre-Operation Inspection
Before starting the system, check:
- The conveyor and detection tunnel are clean
- No tools or metal scraps are left on the machine
- The reject system moves smoothly
- The surrounding area is free from large metal objects
- Cables, covers, and shielding are intact
A clean, interference-free environment ensures stable sensitivity.
Step 2 — Power On & System Initialisation
- Turn on the main power.
- Allow the machine to run its self-check.
- Confirm the status is “Ready” or “Standby.”
- Ensure no product is inside the aperture.
Step 3 — Perform Product Learning (Auto-Setup)
- Prepare several standard product samples.
- Start the Auto-Learn / Product Teach function.
- Let the detector analyse the product’s signal pattern.
- Save the product profile with a clear name (e.g., “Chicken Nugget 300g”).
Proper product learning greatly improves stability—especially for high-salt or high-moisture items.
Step 4 — Sensitivity Setting & Threshold Adjustment
Operators should:
- Select Fe / Non-Fe / SUS sensitivity
- Adjust the threshold to balance detection and stability
- Set belt speed (if adjustable)
Best practice: increase sensitivity until slight false alarms appear, then reduce it slightly for stable production.
Step 5 — Daily Performance Test
Use certified metal test cards:
- Fe (1.0–2.5 mm)
- Non-Fe (1.5–3.0 mm)
- SUS 304/316 (2.5–4.0 mm)
Procedure:
- Insert the test card into or onto the product.
- Run it through the detector.
- Ensure the reject system activates properly.
- Record all results in the test log.
If a test fails, stop production immediately and recalibrate.
This is standard practice across factories equipped with Jindunelec detection lines.
Step 6 — Start Production
After successful tests:
- Run products steadily through the line
- Observe the reject mechanism regularly
- Avoid metal parts, tools, or carts near the aperture
- Prevent product jamming or accumulation
Continuous observation ensures consistent sensitivity.
Step 7 — End-of-Shift Procedures
At shift end:
- Perform another validation test
- Clean the belt and tunnel
- Turn off the power safely
- Document any rejection events, anomalies, or settings used
This strengthens traceability for audits such as HACCP and BRC.
Troubleshooting Guide
Before improving performance, it’s useful to understand what can reduce accuracy in real-world conditions.
Frequent False Alarms
- Product effect too strong → redo Product Learning
- Mechanical vibration → stabilise the machine
- Metal items too close → remove surrounding interference
Weak Sensitivity
- Dirty tunnel or belt
- Wrong product profile selected
- Excessive conveyor speed
- The test card was not placed near the centre
Rejection Not Working
- Low air pressure
- Mechanical obstruction
- Solenoid failure
- Incorrect timing settings
Why High-Quality Detection Matters
Premium systems—such as advanced Food Metal Detector technology or X-ray Inspection Equipment—offer higher sensitivity and better stability, especially for products with strong product effect.
Factories using Jindunelec equipment benefit from optimised detection algorithms and improved audit compliance.
Conclusion
Operating a food metal detector requires more than powering up the machine; it demands consistent testing, disciplined setup, and strict documentation. By following these steps, your production line can maintain stable sensitivity, reduce contamination risks, and stay compliant with international food safety standards.
For professional equipment selection, integration advice, or technical guidance, feel free to contact us anytime.
FAQ