How to Choose the Right Food Metal Detector for Your Production Line
Choosing the right food metal detector is a critical decision for food manufacturers. The correct system protects consumers, prevents recalls, and safeguards brand reputation—while the wrong choice can cause false rejects, downtime, and hidden costs. This guide walks you through a buyer-focused framework to select a detector that truly fits your production line.
What Is a Food Metal Detector and How Does It Work?
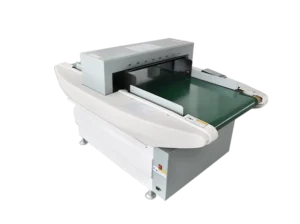
A food metal detector uses electromagnetic fields to detect metal contaminants as products pass through a sensing aperture. When metal is detected, the system triggers an alarm or an automatic reject mechanism to remove the contaminated item.
Compared with X-ray inspection, metal detectors are often preferred for detecting ferrous and non-ferrous metals at lower cost and higher line speeds, especially for packaged or bulk foods. Many production lines use both technologies for layered protection.
Step 1: Define Your Product Characteristics
Your product type directly affects detector performance.
Dry foods (bakery, grains, snacks) are generally easier to inspect with higher sensitivity.
Wet or conductive foods (meat, cheese, ready meals) can cause “product effect,” requiring advanced signal processing.
Frozen products may need wider apertures and stable temperature performance.
Understanding moisture, salt content, and packaging materials is the foundation of choosing the right detector.
Step 2: Match the Detector to Your Production Environment
Production conditions influence durability and hygiene requirements.
Wet washdown areas require stainless steel construction and high IP ratings.
Dry environments may allow more compact or cost-effective designs.
Space constraints determine conveyor size, aperture dimensions, and reject device options.
Always evaluate how the detector will be cleaned, maintained, and integrated into your existing layout.
Step 3: Determine Required Sensitivity Levels
Sensitivity defines the smallest metal contaminant the system can reliably detect.
Key considerations:
Types of metal: ferrous, non-ferrous, and stainless steel all behave differently.
Balance between false rejects and missed contamination.
Product effect compensation for wet or salty foods.
Ask suppliers for real-world test results using your actual product—not just laboratory specifications.
Step 4: Choose the Right System Configuration
Modern food metal detectors offer multiple configuration options:
Single-frequency vs multi-frequency detection
Automatic reject systems (air blast, pusher, drop flap)
Touchscreen controls with user access levels
Data logging for audit trails and quality reporting
These features support daily operations, traceability, and compliance with food safety programs.
Step 5: Understand Compliance and Food Safety Standards
Food metal detection is closely tied to regulatory and customer requirements. Many buyers align systems with HACCP, retailer codes, and international audits.
Look for equipment that supports:
Routine performance validation with test pieces
Secure record keeping
Compatibility with ISO and BRC-style audits
Compliance-ready systems reduce audit risk and simplify documentation.
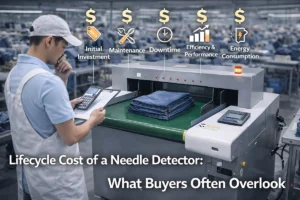
Step 6: Evaluate Cost Beyond the Purchase Price
The cheapest detector is rarely the most economical long term.
Consider:
Maintenance and spare part availability
Downtime caused by false rejects
Training and ease of use
Expected service life and upgrade options
A higher upfront investment can deliver better ROI through reduced waste, fewer stoppages, and lower recall risk.
Step 7: Plan Installation and Line Placement
Correct placement maximizes detection performance.
Best practices include:
Installing after critical risk points (cutting, mixing, packaging)
Ensuring stable product presentation on the conveyor
Allowing space for reject verification and operator access
Proper commissioning and validation are as important as the detector itself.
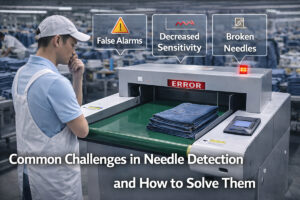
Common Mistakes to Avoid
Choosing based on price alone
Ignoring product effect during trials
Underestimating washdown or hygiene needs
Failing to plan for future line upgrades or capacity growth
Avoiding these pitfalls saves time and cost after installation.
Conclusion
Selecting the right food metal detector is a strategic decision, not just a technical purchase. By evaluating your product type, environment, sensitivity needs, compliance requirements, and total cost of ownership, you can choose a system that protects consumers, supports audits, and keeps your production line running efficiently. Inquire Now!
FAQS

Choosing the right food metal detector is a critical decision for food manufacturers. The correct system protects consumers, prevents recalls, and safeguards brand reputation—while the wrong choice can cause false rejects, downtime, and hidden costs. This guide walks you through a buyer-focused framework to select a detector that truly fits your production line.
What Is a Food Metal Detector and How Does It Work?
A food metal detector uses electromagnetic fields to detect metal contaminants as products pass through a sensing aperture. When metal is detected, the system triggers an alarm or an automatic reject mechanism to remove the contaminated item.
Compared with X-ray inspection, metal detectors are often preferred for detecting ferrous and non-ferrous metals at lower cost and higher line speeds, especially for packaged or bulk foods. Many production lines use both technologies for layered protection.
Step 1: Define Your Product Characteristics
Your product type directly affects detector performance.
Dry foods (bakery, grains, snacks) are generally easier to inspect with higher sensitivity.
Wet or conductive foods (meat, cheese, ready meals) can cause “product effect,” requiring advanced signal processing.
Frozen products may need wider apertures and stable temperature performance.
Understanding moisture, salt content, and packaging materials is the foundation of choosing the right detector.
Step 2: Match the Detector to Your Production Environment
Production conditions influence durability and hygiene requirements.
Wet washdown areas require stainless steel construction and high IP ratings.
Dry environments may allow more compact or cost-effective designs.
Space constraints determine conveyor size, aperture dimensions, and reject device options.
Always evaluate how the detector will be cleaned, maintained, and integrated into your existing layout.
Step 3: Determine Required Sensitivity Levels
Sensitivity defines the smallest metal contaminant the system can reliably detect.
Key considerations:
Types of metal: ferrous, non-ferrous, and stainless steel all behave differently.
Balance between false rejects and missed contamination.
Product effect compensation for wet or salty foods.
Ask suppliers for real-world test results using your actual product—not just laboratory specifications.
Step 4: Choose the Right System Configuration
Modern food metal detectors offer multiple configuration options:
Single-frequency vs multi-frequency detection
Automatic reject systems (air blast, pusher, drop flap)
Touchscreen controls with user access levels
Data logging for audit trails and quality reporting
These features support daily operations, traceability, and compliance with food safety programs.
Step 5: Understand Compliance and Food Safety Standards
Food metal detection is closely tied to regulatory and customer requirements. Many buyers align systems with HACCP, retailer codes, and international audits.
Look for equipment that supports:
Routine performance validation with test pieces
Secure record keeping
Compatibility with ISO and BRC-style audits
Compliance-ready systems reduce audit risk and simplify documentation.
Step 6: Evaluate Cost Beyond the Purchase Price
The cheapest detector is rarely the most economical long term.
Consider:
Maintenance and spare part availability
Downtime caused by false rejects
Training and ease of use
Expected service life and upgrade options
A higher upfront investment can deliver better ROI through reduced waste, fewer stoppages, and lower recall risk.
Step 7: Plan Installation and Line Placement
Correct placement maximizes detection performance.
Best practices include:
Installing after critical risk points (cutting, mixing, packaging)
Ensuring stable product presentation on the conveyor
Allowing space for reject verification and operator access
Proper commissioning and validation are as important as the detector itself.
Common Mistakes to Avoid
Choosing based on price alone
Ignoring product effect during trials
Underestimating washdown or hygiene needs
Failing to plan for future line upgrades or capacity growth
Avoiding these pitfalls saves time and cost after installation.
Conclusion
Selecting the right food metal detector is a strategic decision, not just a technical purchase. By evaluating your product type, environment, sensitivity needs, compliance requirements, and total cost of ownership, you can choose a system that protects consumers, supports audits, and keeps your production line running efficiently. Contact Annie
FAQS
What is the average service life of a needle detector?
In industrial garment environments, a properly designed system typically operates reliably for 7–10 years with routine maintenance.
How do false rejects affect real production cost?
They increase labour, slow throughput, and create hidden delays that accumulate across thousands of garments.
Is a cheaper needle detector always more economical? No. Lower purchase price often leads to higher operational costs due to
No. Lower purchase price often leads to higher operational costs due to instability, downtime, and manual adjustment.
How often should a needle detector be calibrated?
Calibration frequency depends on material variation and environment. Well-designed systems reduce the need for frequent adjustment.
What do major apparel brands expect in audits?
Brands expect documented testing procedures, stable detection performance, and traceable inspection records throughout production.
Share With
Related Articles


Hot Products